Walk across a beautifully designed patio or driveway and you might think you are stepping on natural stone or brick. Then you learn it is actually concrete. Stamped concrete has become one of the most popular choices for outdoor surfaces because it combines the strength of concrete with the look of more expensive materials. It offers a way to achieve a high end appearance without the high end cost.
Stamped concrete is more than just a decorative option. It is a durable, versatile solution that enhances both the function and style of outdoor spaces. Understanding how it works and what it offers can help you decide if it is the right choice for your project. Visit Website to learn more.
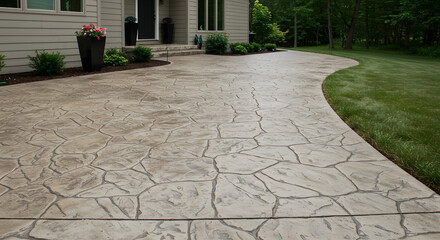
What Is Stamped Concrete
Stamped concrete is a type of concrete that is patterned, textured, or embossed to resemble materials such as stone, brick, slate, or even wood. The design is applied while the concrete is still wet, allowing it to take on the desired texture.
Color is often added to enhance the appearance and create a more realistic finish. This combination of texture and color gives stamped concrete its unique and attractive look.
It is commonly used for patios, driveways, walkways, and pool decks. The goal is to create a decorative surface that maintains the strength and durability of concrete.
Stamped concrete provides both visual appeal and practical performance.
How the Stamped Concrete Process Works
The process begins with preparing the area where the concrete will be installed. This includes clearing the space, leveling the ground, and creating a stable base.
Once the area is ready, concrete is poured and spread evenly. Before it fully sets, color hardeners and release agents are applied to achieve the desired finish.
Special stamps are then pressed into the surface to create patterns and textures. These stamps are designed to mimic the look of natural materials.
After stamping, the concrete is left to cure. Once it has hardened, it may be sealed to protect the surface and enhance its appearance.
Each step is important for achieving a high quality result.
Popular Stamped Concrete Patterns
Stamped concrete offers a wide range of design options. One of the most popular patterns is stone, which replicates the look of natural stone surfaces.
Brick patterns are also common, providing a classic and timeless appearance. These designs are often used for walkways and patios.
Slate patterns offer a more textured and natural look, adding depth and character to outdoor spaces.
Wood patterns are another option, allowing you to achieve the appearance of wood without the maintenance requirements.
Each pattern can be customized with different colors to create a unique design.
Benefits of Stamped Concrete
Stamped concrete offers several advantages that make it a popular choice. One of the most important benefits is its durability. Concrete is strong and can withstand heavy use and changing weather conditions.
Cost effectiveness is another key advantage. It provides the look of premium materials at a lower cost.
Low maintenance is also a benefit. Unlike natural stone or wood, stamped concrete does not require frequent repairs or replacements.
Versatility allows for a wide range of design possibilities. You can customize patterns, colors, and layouts to match your preferences.
In addition, stamped concrete can increase property value by enhancing the appearance of outdoor spaces.
Stamped Concrete vs Other Materials
Stamped concrete is often compared to materials such as pavers, natural stone, and wood. Each option has its strengths, but stamped concrete stands out for its combination of durability and affordability.
Unlike pavers, stamped concrete provides a continuous surface without joints. This reduces maintenance and prevents weed growth.
Compared to natural stone, stamped concrete is more cost effective while still offering a similar appearance.
Wood surfaces require regular maintenance to prevent damage, while stamped concrete is more resistant to weather and wear.
Understanding these differences helps you choose the best material for your needs.
Cost of Stamped Concrete
The cost of stamped concrete varies depending on several factors. The size of the project is one of the main considerations, as larger areas require more materials and labor.
The complexity of the design also affects cost. Detailed patterns and multiple colors may increase the price.
Preparation work, including grading and base installation, can influence the overall cost as well.
While stamped concrete may cost more than basic concrete, it is generally more affordable than natural stone or brick.
Planning your budget helps ensure a successful project.
Maintenance and Care
Maintaining stamped concrete is relatively simple. Regular cleaning helps remove dirt and keep the surface looking its best.
Sealing the concrete is important for protecting it from stains and weather damage. This should be done periodically to maintain durability and appearance.
Inspecting the surface for cracks or wear allows for early repairs. Addressing small issues promptly helps prevent larger problems.
Avoiding harsh chemicals and using proper cleaning methods helps preserve the finish.
With proper care, stamped concrete can maintain its appearance for many years.
Design Ideas for Stamped Concrete
Stamped concrete can be used in a variety of creative ways. Patios are one of the most common applications, providing a stylish and functional outdoor space.
Driveways can also benefit from stamped concrete, adding curb appeal and making a strong first impression.
Walkways and garden paths can be enhanced with decorative patterns, creating a cohesive landscape design.
Pool decks are another popular option. Stamped concrete provides a slip resistant surface while adding visual interest.
Combining different patterns and colors allows you to create a truly unique design.
Final Thoughts
Stamped concrete is a versatile and attractive solution for enhancing outdoor spaces. It combines the strength of concrete with the appearance of more expensive materials, offering both durability and style.
By understanding the process, design options, and benefits, you can make informed decisions that suit your needs and budget. With proper installation and maintenance, stamped concrete provides long lasting value and visual appeal.
In the end, stamped concrete is more than just a surface. It is a way to transform your outdoor space into something functional, beautiful, and uniquely yours.